Friday, May 4, 2012

Sticking it to the man


I don't know why it took us so long to think of this.
I'm a little terrified we will end up as hoarders, but we have been trash picking all kinds of wood scraps. Barry scored some sweet railroad ties about a month ago and instead of building yet another garden border we just stuck em in the ground and put a 2x4 at the top of each pole so we could run 2 lines.
 Oh yea, as far as clothes pin storage is concerned we came up with this little re-purposed gem. All it took was 1 screw and old grapefruit container.

 It's now been 30 days since we used the dryer. Our electric bill went down more than $50. I don't know if we can contribute all of that to the clothesline but either way I'm thrilled.


Thursday, April 26, 2012

The sweet smell of success.

DIY foaming hand soap:
3 drops tea tree oil
3 drops peppermint oil
5-10 drops lavender oil
Liquid Castile soap


Fill the empty hand soap bottle with almost an inch of liquid castile and add your oils. Slowly add warm water until you have a little less than an inch at the top. Pop the top back on that bad boy and gently rock a few times. DON'T SHAKE! Now pump chump.That's it. You're done. Want a little more good news? This cost less than 50 cents to make, even less if you skip essential oils.


1.


2.
3.


 We chose tea tree for it's antiseptic properties, lavender because its so great for dry skin and peppermint for a little pizzazz. Lavender and peppermint is a great combo and helps cover the slightly medicinal smell tea tree oil can give off.


FAIL!

Hmmmm.....homemade lotion? I'm in. After checking a few recipes we found the best looking one on http://frugallysustainable.com/ this website is genius. Our main motivation behind the recipe? It's lack of borax. It's great for cleaning but i don't wanna rub it into my skin. Side note: the store bought lotion I've been using my whole life contains much worse. So we tried it.


First things first, wash and sanitize your designated lotion jar or use and old plastic lotion bottle. Just make sure everything is thoroughly washed and dried.

Now group your ingredients:
1 cup Aloe Vera Gel
3/4 oz. Beeswax, grated
1/2 cup Grape seed Oil
1 tsp Vitamin E Oil
15 drops Lavender Oil


Melt the Beeswax into Grape Seed Oil in a double boiler. We used a Pyrex glass bowl placed inside your average pasta pot filled 1/3 of the way with water.


THIS IS WHERE WE SCREWED UP!!!! 
DO NOT MIX YOUR ALOE IN WHEN THE BEESWAX/ OIL IS STILL A LIQUID!!!!!


So to do this the correct way once the Grape seed oil and Beeswax combo has cooled slowly add your Aloe, Vitamin E oil and essential oil.We used lavender oil because its good for Eczema, Psoriasis, and skin issues in general. Our Problem? lack of patience. We didn't realize letting the oil cool meant like almost back to a solid, cool.

 So we ended up with this little beauty. We tested it on ourselves first. Results: A little sticky and a little grainy, but all in all, smells good and moisturizes. Aesthetically? Hideous. We'll update you with our second batch after I use up this lifetime supply of poison moisturizers


This particular batch is for our adorable pit bull Dexter. Poor Dex, he's got very dry skin and an oatmeal bath doesn't seem to do the trick. Plus, with dry skin you should wash him as little as possible. 


 Look how thankful our little man is for his first application of home made ugly lotion.

Wednesday, April 11, 2012

The best of both worlds

Got some milk at the Newark Co-Op.Organic, Grass fed and local......ish. Pennsylvania totally counts as local, right?

Tuesday, April 10, 2012

Organic or Grass fed? that is the question

We have made some of the most basic (and necessary) changes to our diet one step at a time. I'm sure you all realize how important, yet expensive going organic is. We started with the organic, free range eggs. Delicious, but an extra $2 a dozen. Organic Milk, delicious but an extra $1 per half gallon.Frozen organic Berries  (no, not Barry's :) didn't really cost any extra as long as we stocked up when they were on sale. Last but not least, organic celery. So a quick explanation as to why we decided these should be our organic staples. You want to consider which foods you consume the most of and which are most cost efficient. Also, some foods are simply more susceptible to pesticides and other poisons. A great way to decide which small changes would work best for you is checking out what is known as "the dirty dozen". This link will give you a quick run down. http://www.organic.org/articles/showarticle/article-214 What you really wanna know is how to do it and save some cash. Obviously, stock up on anything frozen on sale and ideally grow as much as you can on your own. If you grow your own, you know exactly what goes into your dirt and what goes into your mouth. But, today we discovered a new way BUY LOCAL! We went to locust point farms located off of route 213 right here in Elkton, MD. We got 1.37 lb of ground turkey for $3.00 because they do all the processing and sell it on the farm. No gas to ship, no extra cost to the consumer. Stopped at Detwiler's Farm market on the way and got tomatoes from Dover, DE and green beans dirt cheap. Just buy wisely and plan your meals around the best priced items. Now this is where it get's confusing....do we buy organic milk in the grocery store even though it's less cost efficient and has to be shipped (Horizon's comes all the way from Colorado!) or do we go with the grass fed non-organic local milk? So we want YOUR opinion. Come on patchouli sniffers tell us what you think.

Monday, April 2, 2012

Out with the old and in with the.....Older?

Here is our coffee maker. Isn't he cute?
 This lil darling is our #1 survival tool.
 Good thing we love him so much, cause he's expensive. 

For the 2 of us we always make 10 cups of coffee. We almost always throw away at least 2 cups.We have to buy filters and use electricity to get it going and even more to keep it warm for the 2 hours it takes us to consume that delicious java. 

Say hello to Monsieur French Press. We bought him for $2 at a yard sale. It makes 4 cups at a time. Just fill this Parisian gentleman with coffee grounds and boiling water and....PRESS! Voila'! Sorry buddy you've been replaced. Now we just have to invest in some fair trade, organic beans and get a manual grinder
 (Side note we ran white vinegar through the old automatic to clean it and put him in storage, just in case)

Friday, March 30, 2012

Just a warning

This is just a little side note, when you build your raised beds and go to put a sub layer of compost down before your soil, Never..Ever...Ever...Ever put non decomposed green leaf lettuce down. In 1 week it has sprouted up and taken over the bed I had to turn the whole bed over and remove all of the roots and stems. Big pain and time consuming, so just use fully composted materials.

Save the Seedlings!!!

Say hello to our little seedlings!
 We have been working on these bad boys for about a month now.Since our yard is basically all clay and you can't grow anything in it, we had to import some of that good dirt. We picked up a truckload of soil for $28. It is composed of compost, mushroom and top soil. Dropped a few seeds in each biodegradable cup full of dirt, a good dose of H2O and used cupcake tins with clear lids to trap moisture and retain heat. On warm days we'd let the  little guys stay outside for a few hours.
 Everything was looking good but we did develop some mold. Solution: 9 parts water 1 part apple cider vinegar in a spray bottle and give 'em a squirt once a day.Problem solved.
 The weather took a turn for the worst and since they couldn't spend anytime outside in the rec yard.....


 We built a green house. Just took an old china cabinet that was headed for the landfill and did what?!?!


 Re-Purposed!
We just pulled the particle board off the back and set it in front of the window (this one gets the most sun and is near a heat vent).
 Someday they'll get to go back outside, but for now they're thriving and surviving in a warm environment with plenty of sun.


Got time for a quickie?

Just wanted to show a quick Before:
And After


We all picked a shirt (some dirtier than others) and it took out any new dirt and stains. It didn't clean the 5 year old stains in Barry's favorite college t-shirt. But neither would any of the name brand , store bought detergents. No allergic reactions so no reason to purchase laundry detergent ever again. 


Sunday, March 25, 2012

The Laundry Experiment

3 Basic Ingredients

Obviously there are 4 ingredients in this picture. Those damned essential oils, they'll getcha every time. So we just pulled a few at home recipes and made some minor adjustments.The possibilities were endless. Powdered seemed prominent but I'm just a liquid kinda gal. Most Recipes called for laundry bar soap (had trouble finding an organic) or liquid Castile soap. So.....we just got Castile in a Bar! Our resourcefulness and know how is astounding. Now a basic tutorial. 

You will need:

1/2 a bar of Pure-Castile Soap,grated or
1/3 a bar of laundry soap,grated

1/2 cup washing soda
1/2 cup borax powder
1 tbsp essential oil of your choice(some are harsher than others, so do some research)  optional
2 gallon jugs
Funnel (we made one using a 2-liter bottle, re-purposing baby) 
Designate a large pot to cook up your crazy ass at home concoctions. Also, pick your least favorite stirring utensil, and a grater or knife... these too are now lost to the hippies.

Even if this sucks as detergent the house smells awesome


Drop the soap you have obviously grated into the large pot over medim heat. Add 6 cups of water.Add  Borax, Washing Soda and the essential oil. Now just stir till it all dissolves. Once dissolved it just needs 5 more minutes to cook with the occasional stir. Pull it off the the heat and let sit 5 more minutes. Place half the contents into each bottle and fill half way with hot water, using that sweet homemade funnel.


 Shake ferociously then fill the remaining half of each jug with hot water. Now back to shakin it like a salt shaker. You should actually shake much, much harder than you would a salt shaker. Let it sit for 24 hrs. it will gel up and kinda looks like egg whites. Bam! Laundry detergent. Break Down of cost $3.50 to do approx. 75 loads. 1/2 cup per load or 2/3rds if needed. Worked and Smelled Great. Sold


The Floating Garden's of Elkton


     So this is just a side project we started working on. We took some of our leftover chicken wire from the compost bin project and put it to use. The idea started as somewhere to plant our herbs where the Dog and Cat could not bother them, but it is quickly turning into our own little hanging flower garden. This is very easy to make, all you need is...
  • Chicken wire, or any fencing you have lying around
  • Recycled plastic bottles(size does not matter)
  • Scissors
  • wire cutters
Start by putting a drainage slit in the cap of the bottle, then just cut the bottom off, and put two small holes on either side of the middle of the bottle. Now just cut the cross wire on every other square of the fencing and put the prongs through the sides of your bottle to support and hang it, and Wala! you have a hanging garden. Just plant some seeds and watch them grow. We will update more pictures once the sprouts actually start popping up.


Saturday, March 24, 2012

The circle of life......or Composting.
     So this is where it all began, and where it all will end. There are endless designs and ideas for building your own compost pile at home, such as three stage, tumblers, open piles, and so on. However if your space, time, and finances are limited like ours this plan is easy and so far is working great. The gardening and landscape center down the road from us was closing up shop and moving to a better location. What was a bad turn of events for them turned out to be great for us. We bought about 40ft of chicken wire, trellises, rebar,and countless other items for a very pocket friendly price.
     These two compost bins from start to finish took about 10 minutes. All you have to do is cut about 10ft of wire and roll it around itself to form the cylinder, then just weave the rebar through the fencing and hammer into the ground and you have a compost bin.Don't forget a lid to keep out unwanted critters. We used the remaining chicken wire.It's a bit difficult to pull back when you want to add scraps and my adorably uncoordinated girlfriend has scratched herself a few times. So, by next year we will make a few lid adjustments. Now all you have to worry about is making sure you have the proper mix of carbon,phosphates, and nitrates. Basically just make sure you have a good mix of green and brown and you won't have to worry.
     General upkeep and health of your compost bin is easy and you barely have to think about it. We add all produce scraps, egg shells, coffee grounds, biodegradable paper and paper towels, also once your garden is done for the season whatever you do not till back into the soil can be thrown into the compost. Basically you can add most anything organic just no Meat, fecal matter, dairy, or anything that has already been cooked, all of these can breed bacteria and stop your compost in it's tracks. The only real work you will have to do is once a week stir up the compost to make sure it is aerated and semi damp(like a wrung out sponge).
     Now for a completely non classy, yet, effective tip on speeding up and enriching your compost pile......PEE ON IT. I know it sounds gross, and also risky if your backyard privacy fence isn't all that high and your neighbor catches you mid stream at 8am( what was i supposed to do? stop mid stream?). We have a good amount of hay in our compost an when mixed with urine it produces nitrogen quickly. Don't worry by the time it is all done composting everything is broken down to basic elements and you are not putting pee soil on your plants. This chore is for men only, and I am not being sexist or saying women can't do it (although if Angela tried, I'm sure I would have jokes to last all year!). Feminine urine is much more acidic than that of male urine and can be detrimental to decomposition and the resulting soil balance. If you don't believe me feel free to research it, I recommend http://www.treehugger.com/lawn-garden/is-male-pee-better-than-female-pee-the-compost-conundrum.html

Aesthetics!
     If you are worried about having ugly bins full of compost becoming an eye sore, do not worry. There are many ways to disguise and hide them to where you won't even know they are there. We went with two trellises in front of them where we plan to grow our snap peas and green beans. This way they are fully blocked from view and once the peas begin to bloom in mid summer any minimal odors from the compost will be disguised.


Friday, March 23, 2012


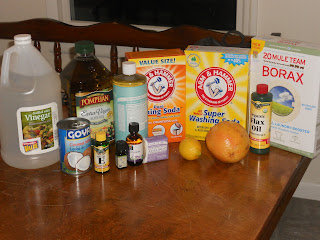
This should be enough to clean everything, and I do mean everything. Your house, your laundry....your nasty hippie ass. Rough estimate of total cost $75. Essential oils are your priciest purchase and totally optional. If you're overly paranoid like myself, research the risks and benefits of essential oils and use sparingly.

White Vinegar(might as well get apple cider vinegar too, its great for gardening problems)
Olive Oil (at some point we'll be purchasing grape seed oil as well)
Coconut Milk(we bought this non-organic prior to our whole foods trip)
Vitamin E oil
Flax Oil
Any and all citrus fruits
Pure Castile Soap (bar and liquid)
Washing Soda
Baking Soda
Borax(it's your new best friend)


Oops, we forgot to name-drop salt. The kosher and sea varieties are best but good ol' Morton's will do the trick.

So here's the plan....

So Barry and I decided to give up the booze for 30 days and as you would suspect we needed to come up with a plan to fill the void it left in our hearts and our liver's. We started a compost pile about a month ago and it snowballed from there. So here is our guide to cheaper, healthier living that even the laziest of hippies could pull off. We have no idea what we are doing, so feel free to follow along and laugh at our mistakes and celebrate our triumphs.